How To Use SSH Remote On Mac For Free: A Beginner's Guide
So, you're looking to master SSH remote on your Mac without spending a dime? You've come to the right place, buddy. SSH (Secure Shell) is one of the most powerful tools for remote access, and setting it up on your Mac is a lot easier than you might think. Whether you're a developer, IT admin, or just someone who wants to learn something new, this guide will walk you through the process step by step. Let me tell you, SSH is like a magic wand for accessing your devices securely from anywhere.
But hold up, before we dive into the nitty-gritty, let's talk about why SSH is such a big deal. It's not just about connecting to a remote server; it's about doing it safely. In today's world, where cyber threats are lurking around every corner, SSH encrypts your data and keeps your connection private. That means no snoopers, no hackers, and no worries. Who wouldn't want that, right?
Now, if you're wondering whether you can use SSH on your Mac for free, the answer is a big fat yes. macOS comes with SSH built right into the system, so you don't need to break the bank or download any fancy software. All you need is a bit of know-how, and we're here to give you exactly that. So, grab your coffee, sit back, and let's get started.
- Movierulz 2024 Your Ultimate Guide To Streaming Movies Safely And Legally
- Hdhub4u South Movies Your Ultimate Destination For Blockbuster Entertainment
What is SSH and Why Should You Care?
First things first, let's break down what SSH actually is. SSH stands for Secure Shell, and it's a protocol that lets you access and manage remote computers securely. Think of it as a secure tunnel that connects your Mac to another device, allowing you to send commands, transfer files, or even troubleshoot issues from afar. Pretty cool, huh?
Here's the kicker: SSH encrypts all the data that flows between your Mac and the remote device. That means even if someone intercepts your connection, they won't be able to make sense of it. This level of security is especially important if you're working with sensitive information or managing servers in the cloud.
Some key benefits of using SSH include:
- Secure communication between devices
- Easy remote access without needing physical presence
- Wide compatibility with various operating systems
- No extra costs since macOS already has SSH built-in
Setting Up SSH on Your Mac: The Basics
Alright, now that you know what SSH is, let's talk about setting it up on your Mac. Don't worry; it's not rocket science. In fact, macOS makes it super easy to get started. All you need is the Terminal app, which is like a command center for your computer.
To open Terminal, simply go to "Applications"> "Utilities"> "Terminal." Once you're in, you'll see a black screen with a blinking cursor. This is where the magic happens. Now, let's move on to enabling SSH on your Mac.
Enabling SSH on macOS
To enable SSH on your Mac, follow these steps:
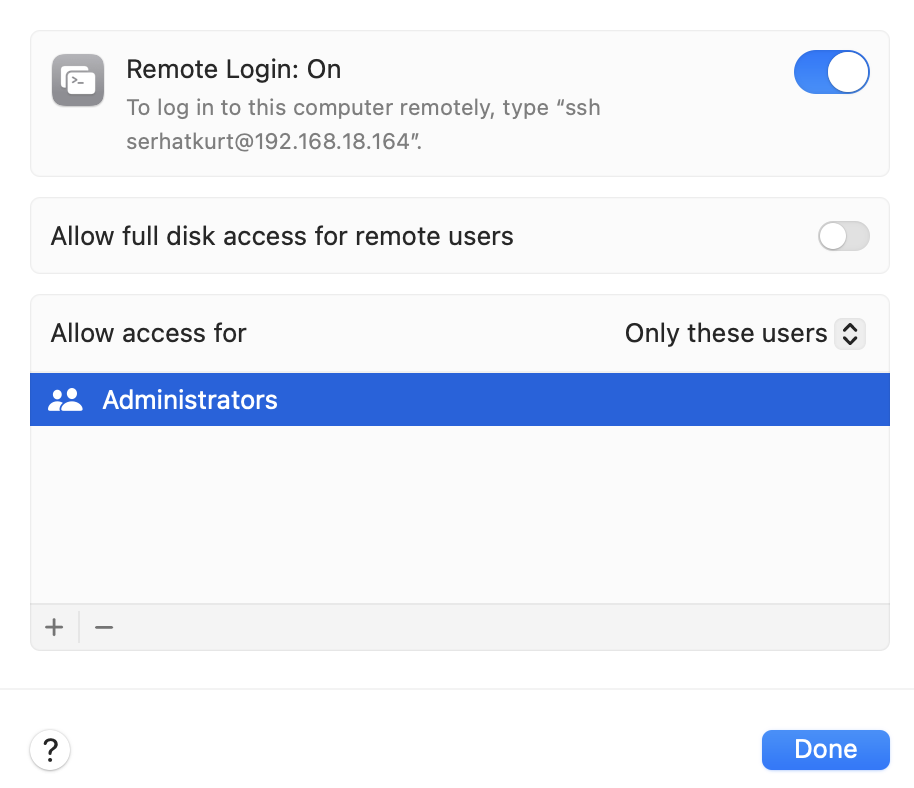
- Go to "System Preferences"> "Sharing."
- Check the box next to "Remote Login" to enable SSH.
- You'll see a message saying, "To log in to this computer remotely, type..." Take note of the IP address mentioned there; you'll need it later.
And that's it! You've just enabled SSH on your Mac. Wasn't that easy? Now let's move on to the next step: connecting to a remote server.
Connecting to a Remote Server Using SSH
Connecting to a remote server using SSH is where the fun begins. Whether you're managing a web server, accessing a database, or just testing some code, SSH makes it all possible. Here's how you do it:
Open Terminal and type the following command:
ssh username@remote_host
Replace "username" with the username of the remote server and "remote_host" with the server's IP address or domain name. For example:
ssh john@192.168.1.100
Once you hit Enter, your Mac will try to establish a connection with the remote server. If it's your first time connecting, you might see a message asking if you trust the server. Just type "yes" and hit Enter. After that, enter your password when prompted, and voilà! You're now connected.
Troubleshooting Common SSH Issues
Let's face it; sometimes things don't go as planned. If you're having trouble connecting to a remote server, here are a few things to check:
- Make sure SSH is enabled on both your Mac and the remote server.
- Double-check the username and IP address you're using.
- Ensure there are no firewall rules blocking your connection.
- Try restarting your router or modem if the issue persists.
Most of the time, these simple checks will fix the problem. But if you're still stuck, feel free to drop a comment below, and I'll do my best to help you out.
SSH Keys: The Key to Secure Connections
Now, here's a pro tip: using SSH keys instead of passwords is a game-changer. SSH keys are like digital passports that allow you to connect to a remote server without entering a password every time. Plus, they're way more secure than regular passwords.
To set up SSH keys, follow these steps:
- Open Terminal and type:
ssh-keygen -t rsa - Press Enter to accept the default file location.
- Enter a passphrase (optional but recommended) to protect your key.
- Once the key is generated, copy it to the remote server using:
ssh-copy-id username@remote_host
That's it! From now on, you'll be able to connect to the remote server without typing a password. How cool is that?
Managing SSH Keys
As you start working with more servers, managing SSH keys can become a bit overwhelming. Here are a few tips to keep things organized:
- Use unique keys for different servers to enhance security.
- Store your keys in a secure location and avoid sharing them with others.
- Regularly update your keys and remove old ones that are no longer needed.
Trust me; a little bit of organization goes a long way when it comes to SSH keys.
Advanced SSH Techniques
Once you've mastered the basics, it's time to level up your SSH skills. There are tons of advanced techniques you can use to make your life easier. Here are a few to get you started:
SSH Tunnels
SSH tunnels are like secret passageways that let you access services on a remote server securely. For example, you can use an SSH tunnel to access a database or a web service that's only available locally on the server.
To create an SSH tunnel, use the following command:
ssh -L local_port:destination:destination_port username@remote_host
Replace "local_port" with the port you want to use on your Mac, "destination" with the IP address or hostname of the service you're trying to access, and "destination_port" with the port number of the service.
SSH Config Files
Tired of typing long SSH commands every time you want to connect to a server? SSH config files are here to save the day. These files let you store connection details for all your servers in one place, making it super easy to connect.
To create an SSH config file, open Terminal and type:
nano ~/.ssh/config
Then, add the following lines for each server:
 Host server1
 HostName 192.168.1.100
 User john
 Port 22
Save the file and exit. Now, you can connect to the server by simply typing:
ssh server1
Isn't that awesome?
SSH Best Practices
Before we wrap things up, let's talk about some SSH best practices to keep your connections secure and efficient:
- Always use SSH keys instead of passwords whenever possible.
- Regularly update your SSH software to fix any security vulnerabilities.
- Avoid using root accounts for SSH connections; stick to regular user accounts instead.
- Limit SSH access to specific IP addresses if you're managing sensitive servers.
By following these practices, you'll ensure that your SSH connections are as secure as possible.
Conclusion: Take Your SSH Skills to the Next Level
And there you have it, folks! You now know how to use SSH remote on your Mac for free. From setting up SSH to connecting to remote servers and mastering advanced techniques, you're well on your way to becoming an SSH expert. Remember, practice makes perfect, so don't be afraid to experiment and try new things.
Before you go, here's a quick recap of what we covered:
- What SSH is and why it's important
- How to enable SSH on your Mac
- Connecting to remote servers using SSH
- Setting up and managing SSH keys
- Advanced SSH techniques like tunnels and config files
Now it's your turn to take action. Leave a comment below and let me know how SSH has changed the way you work. Or, if you have any questions, feel free to ask, and I'll do my best to help you out. Happy SSH-ing, and see you in the next article!
Table of Contents
- What is SSH and Why Should You Care?
- Setting Up SSH on Your Mac: The Basics
- Connecting to a Remote Server Using SSH
- SSH Keys: The Key to Secure Connections
- Advanced SSH Techniques
- SSH Best Practices
- Conclusion: Take Your SSH Skills to the Next Level

Detail Author:
- Name : Iliana Johnston
- Username : curt30
- Email : aconroy@yahoo.com
- Birthdate : 1987-08-09
- Address : 641 Ulises Burg East Merrittland, AZ 54237-9829
- Phone : +1.518.929.2056
- Company : Kovacek Inc
- Job : Computer Repairer
- Bio : Iste hic aliquid distinctio voluptas. Expedita eos laudantium labore dignissimos minima pariatur. Molestias aperiam eum nihil atque pariatur consequatur cumque.
Socials
instagram:
- url : https://instagram.com/gunner278
- username : gunner278
- bio : Enim necessitatibus ipsum eos laboriosam et. Minus ab iusto hic. In officiis harum expedita atque.
- followers : 1383
- following : 1753
twitter:
- url : https://twitter.com/gunnerhoppe
- username : gunnerhoppe
- bio : Libero atque accusantium impedit voluptatem. Dolore dolores architecto ipsum dolorum tempore molestiae minus nulla.
- followers : 6804
- following : 2916
tiktok:
- url : https://tiktok.com/@gunnerhoppe
- username : gunnerhoppe
- bio : Consequatur maiores et eaque quia. Ut itaque et rerum et libero quia officia.
- followers : 5459
- following : 322


 is one of the most powerf)