SSH Raspberry Pi IoT Projects For Beginners: Your Gateway To Smart Living
So, you've finally decided to dive into the world of SSH Raspberry Pi IoT projects for beginners! Welcome to the club, my friend. If you're here, it means you're ready to level up your tech skills and explore the fascinating realm of Internet of Things (IoT). But hold on, before we get to the fun part, let's talk about why this is such a game-changer. Whether you're building a smart home or just tinkering with cool gadgets, SSH Raspberry Pi IoT projects are where the magic happens.
Now, I know what you're thinking: "Is this going to be too complicated?" Spoiler alert—it’s not! Sure, there’s some tech jargon involved, but we’re keeping things super simple here. This article is tailored for beginners like you who want to learn the basics without feeling overwhelmed. Think of it as a friendly guide that’ll walk you through the process step-by-step.
By the end of this, you’ll have enough knowledge to start your own IoT projects. And hey, who knows? Maybe one day, you’ll be the one teaching others how to do it. But first things first, let’s break it down and make sure you’re ready to roll. So grab your Raspberry Pi, a cup of coffee, and let’s get started!
- 4 Moviesrulez Your Ultimate Guide To Streaming And Downloading Movies
- Telugu Movies Watch Online Movierulz The Ultimate Guide For Movie Enthusiasts
Table of Contents
- What is SSH and Why Does It Matter?
- Raspberry Pi 101: A Quick Overview
- IoT Basics: What Every Beginner Should Know
- SSH Raspberry Pi IoT Project Ideas for Beginners
- Step-by-Step Setup Guide for SSH on Raspberry Pi
- The Tools You Need to Get Started
- Security Tips for Your IoT Projects
- Common Issues and How to Fix Them
- Expanding Your Knowledge Beyond the Basics
- Wrapping It Up: Time to Get Building
What is SSH and Why Does It Matter?
Alright, let’s start with the basics. SSH stands for Secure Shell, and it’s basically a way to remotely access your Raspberry Pi without needing to physically touch it. Think of it like a secret tunnel that lets you control your device from anywhere. For IoT projects, this is super important because it allows you to manage your setup even when you’re not in the same room.
SSH is secure, fast, and easy to set up once you get the hang of it. It’s also a must-have if you’re planning to build anything that requires remote access, like a smart home system or a weather station. Plus, it’s free, which is always a bonus, right?
Why Use SSH for IoT Projects?
Here’s the deal—IoT projects often involve devices that are spread out across different locations. Without SSH, you’d have to physically go to each device every time you needed to make changes. That sounds like a lot of work, doesn’t it? With SSH, you can sit back, relax, and control everything from your laptop or phone.
- Anjali Arora New Mms The Buzz The Facts And What You Need To Know
- Unveiling The Truth Behind The Sex Mms Scandal
And let’s not forget about security. SSH encrypts all your data, so you don’t have to worry about prying eyes snooping around your project. It’s like having a digital fortress for your IoT creations.
Raspberry Pi 101: A Quick Overview
Now, let’s talk about the star of the show—the Raspberry Pi. This little device is basically a mini computer that can do almost anything. From running a web server to controlling robots, the possibilities are endless. And the best part? It’s affordable, which makes it perfect for beginners who don’t want to break the bank.
There are different models of Raspberry Pi, but for most IoT projects, the Raspberry Pi 4 is the way to go. It’s powerful, has plenty of ports, and supports WiFi and Bluetooth, which are essential for IoT setups. Plus, it’s compatible with tons of accessories, so you can customize it to fit your needs.
Key Features of Raspberry Pi
- Compact size
- Multiple GPIO pins for connecting sensors and devices
- Built-in WiFi and Bluetooth
- Supports various operating systems
- Affordable price tag
With all these features, it’s no wonder why Raspberry Pi has become the go-to choice for IoT enthusiasts. Whether you’re building a smart home or experimenting with robotics, this little board has got you covered.
IoT Basics: What Every Beginner Should Know
Before we dive into the projects, let’s take a moment to understand what IoT is all about. IoT, or Internet of Things, is the network of physical devices, vehicles, appliances, and other objects embedded with sensors, software, and connectivity that allows them to exchange data. In simpler terms, it’s about making everyday objects "smart" by connecting them to the internet.
For beginners, the key to mastering IoT is starting small. You don’t need to build a fully automated house on your first try. Instead, focus on simple projects that teach you the fundamentals. Once you’ve got the basics down, you can gradually move on to more complex setups.
Basic Components of IoT Projects
- Sensors: These collect data from the environment, like temperature or motion.
- Connectivity: Devices need a way to communicate with each other, usually via WiFi or Bluetooth.
- Data Processing: This is where the Raspberry Pi comes in. It processes the data collected by the sensors and decides what to do with it.
- User Interface: How you interact with your IoT setup, whether it’s through a phone app or a web dashboard.
Understanding these components will help you design projects that are both functional and fun. And trust me, the more you experiment, the more ideas you’ll come up with.
SSH Raspberry Pi IoT Project Ideas for Beginners
Now that you know the basics, it’s time to get your hands dirty with some cool projects. Here are a few ideas to get you started:
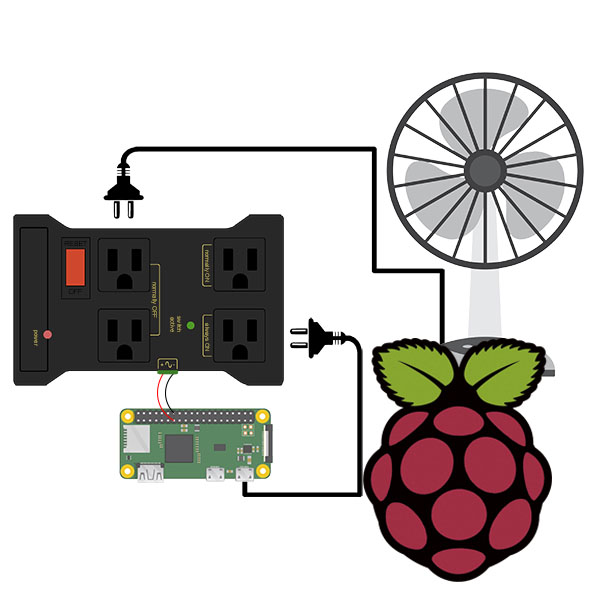
1. Smart Home Automation
Create a system that controls your lights, thermostat, and other appliances remotely. With SSH, you can access your Raspberry Pi from anywhere and adjust settings on the fly. This is a great way to save energy and make your life more convenient.
2. Weather Station
Set up a weather station that collects data on temperature, humidity, and air pressure. You can even program it to send you alerts when certain conditions are met. This project is perfect for anyone interested in meteorology or just wants to keep an eye on the weather.
3. Security Camera
Turn your Raspberry Pi into a surveillance system that streams live video to your phone. With SSH, you can check in on your home or office anytime you want. It’s a cost-effective alternative to expensive security systems.
4. Smart Garden
Build a system that monitors your plants and waters them automatically. This is ideal for people who love gardening but don’t have the time to take care of everything manually. Plus, it’s a great way to learn about environmental sensors.
Step-by-Step Setup Guide for SSH on Raspberry Pi
Ready to set up SSH on your Raspberry Pi? Follow these simple steps:
- Install Raspberry Pi OS on your device.
- Enable SSH by creating an empty file named "ssh" on the boot partition.
- Connect your Raspberry Pi to the same network as your computer.
- Find the IP address of your Raspberry Pi.
- Use an SSH client (like PuTTY for Windows or Terminal for Mac/Linux) to connect to your Raspberry Pi.
That’s it! You’re now ready to start tinkering with your IoT projects. Remember, practice makes perfect, so don’t be afraid to experiment and try new things.
The Tools You Need to Get Started
Before you start your SSH Raspberry Pi IoT projects, make sure you have all the necessary tools:
- Raspberry Pi (preferably Model 4)
- MicroSD card with Raspberry Pi OS installed
- Power supply for Raspberry Pi
- Sensors and actuators (depending on your project)
- SSH client software
- Network connection
Having the right tools will make your projects smoother and more enjoyable. And don’t forget to invest in a good case for your Raspberry Pi to protect it from dust and damage.
Security Tips for Your IoT Projects
Security should always be a top priority when working with IoT devices. Here are a few tips to keep your projects safe:
- Change the default password for your Raspberry Pi.
- Use strong, unique passwords for all your devices.
- Keep your software and firmware up to date.
- Use a firewall to protect your network.
- Be cautious when sharing your project online.
By following these tips, you’ll ensure that your IoT creations are as secure as possible. Remember, security is an ongoing process, so stay vigilant and keep learning.
Common Issues and How to Fix Them
Every beginner runs into problems at some point, and that’s completely normal. Here are a few common issues you might encounter and how to fix them:
- SSH Connection Refused: Make sure SSH is enabled and your Raspberry Pi is connected to the same network.
- Incorrect IP Address: Double-check the IP address and try pinging it from your computer.
- Sensor Not Working: Verify that the sensor is properly connected and powered.
- Code Errors: Check your code for typos and syntax errors.
If you’re stuck, don’t hesitate to ask for help. There are plenty of online communities and forums where you can find support and advice.
Expanding Your Knowledge Beyond the Basics
Once you’ve mastered the basics, it’s time to take your skills to the next level. Here are a few ways to expand your knowledge:
- Read books and articles on IoT and Raspberry Pi.
- Watch tutorials and follow along with more advanced projects.
- Join online communities and forums to connect with other IoT enthusiasts.
- Experiment with different sensors and devices to see what you can create.
The more you learn, the more creative you’ll become. And who knows? You might just come up with the next big thing in IoT.
Wrapping It Up: Time to Get Building
And there you have it—everything you need to know to get started with SSH Raspberry Pi IoT projects for beginners. From setting up SSH to building your first project, you’re now equipped with the knowledge and tools to make your ideas a reality.
Remember, the key to success is persistence and curiosity. Don’t be afraid to make mistakes—they’re part of the learning process. And most importantly, have fun! IoT is all about creativity and innovation, so let your imagination run wild.
Now, it’s your turn. Leave a comment below and let me know which project you’re most excited to try. And if you found this article helpful, don’t forget to share it with your friends. Happy building, and see you in the next one!


Detail Author:
- Name : Susie Rau
- Username : cmurazik
- Email : tiana11@jones.com
- Birthdate : 1990-04-30
- Address : 5211 Dach Coves Gerlachland, VA 74969
- Phone : +1.941.615.4224
- Company : Grady-Ratke
- Job : Dancer
- Bio : Aliquam ipsa debitis quae fugiat. Iure minus et sunt reprehenderit fugit quo. Distinctio ad nihil architecto aut aperiam vel. Repellat magnam aut vel et unde. Totam quod aut maiores.
Socials
twitter:
- url : https://twitter.com/kpagac
- username : kpagac
- bio : Optio dolores qui et optio sit explicabo necessitatibus. Aliquam et eos enim qui et cupiditate.
- followers : 4035
- following : 1495
instagram:
- url : https://instagram.com/kaylah1040
- username : kaylah1040
- bio : Nemo et enim voluptatem architecto. Non rerum facilis ipsam magnam. Sed nobis rerum enim sit.
- followers : 6002
- following : 247
tiktok:
- url : https://tiktok.com/@kaylah.pagac
- username : kaylah.pagac
- bio : Sint et molestias et voluptatem et. Quos eum voluptatem ea et sed totam.
- followers : 6053
- following : 376
linkedin:
- url : https://linkedin.com/in/pagack
- username : pagack
- bio : Consequatur magni id non sequi tempore.
- followers : 1724
- following : 1069
facebook:
- url : https://facebook.com/kaylahpagac
- username : kaylahpagac
- bio : Ut unde error iste consequatur pariatur distinctio in est.
- followers : 6637
- following : 2525
